Wednesday, March 21, 2012

Cheesy Baked Potato Soup

I'm a huge fan of the crockpot, seriously the best invention ever. As a mom of 4 I have stuff to do and if I don't want to worry about what time to start prepping dinner (4pm) and what time dinner needs to be served before kids are starving (5:30pm) then I use the crockpot. Throw it in around noon and cook it till you're hungry, best way to cook any meal if you ask me.... Anyhow, one of my favorite meals is potato soup. I just love it's creamy, cheesy, hearty, warmness (its a word...I think), especially on a day like today (and the 2 previous days) where it's rainy and chilly all day long. I'm one to mess with ingredients and try new things from time to time so this recipe can be changed to fit anyone's flavor pallet. I've made a similar recipe in the past but since this one really won me over I thought I'd post it for the lovely people who read my blog.

Ingredients:
4 Large Potatoes
1 1/2 smaller containers of chicken stock (more or less depending on how thick you want it. Also try to go sodium free if you can, it's healthier and doesn't have a flavor difference)
8oz package of cream cheese (works fine to use low fat as well)
2.5oz package of bacon pieces(I just bought the generic from Walmart and it was 2.5oz so use however much you want)
1cup shredded cheese (more or less depending on how cheesy you want it)
Mrs. Dash Original seasoning
1/2 package of Ranch seasoning.

Wash potatoes and make sure to cut off the "eyes" (mine were already staring at me, I bought them 2 days prior...) and dice into half inch pieces. I like to leave the skins on because I'm a)lazy and b)think the skins are good for you (think my mom convinced me of that so if it's true or not I don't really know). Then throw them in the crock pot and pour in chicken stock and a DASH of MRS. DASH (I'm soooo funny right?! lol) mix up so the seasoning isn't just sitting on the top of your soup and leave on high for 4 hours or so.


Once your close to the 4 hour mark set your cream cheese out for a little while to help soften it up. You don't have to do this but if you don't it makes it difficult to mix into your soup. And to help even further take 1 fluid cup of chicken stock from your soup 


Now cut your cream cheese into 8 or so pieces so that you can easily whisk into your stock. This may take some mashing if you didn't let it sit out long enough but it works out in the end. If you need a little more stock to help mix it, do so, it won't hurt anything. 
Should be smooth once you're finished mixing

Stir the mixture back into your crock pot, will look a little runny at first but will settle after 5 minutes. Add your bacon and shredded cheese. Along with your ranch seasoning (the ranch was a total after thought when I made this because I thought it needed something else).
Looks like a loaded bake potato huh?


Like I said, let it sit for 5-10 minutes. It will turn out cream and yummy and the cheese will be well melted by this time. Enjoy!!

I fed 5 people on this and had a lot leftover!!


Saturday, March 17, 2012

Epically fail as a mom...

St. Patrick's day!!! Yay!!!! Finally got to go out with my husband since I turned 21 in 2005!!! Great time, I mean minus being the ONLY girl, but still fun. Anyhow we left around midnight, picked up the kids, and came home. I'm in heels, have a sleeping 3 year old and need to carry him to our apartment, buildings down, which wouldn't be bad except the fact that our parking lot is uneven and full of cracks and pot holes. Anyhow I fell and totally didn't prevent my kid from hitting the ground with me. By man I tried my hands at scratched to all hell to prove it. Pretty sure my knee is not only going to have a bruise but also look like ive been crawling on carpet all day, and I'm pretty sure I sprang my foot. Did I mention despite hear enjuries my poor bubba hit the ground. I just feel horrible and know that the apartment won't do anything about it. 6 parking spots for 12 homes in the building and 10 visitor spots for 3-4 buildings... Fantastic planning!!!

Wednesday, March 14, 2012

Baby legs!

Im a huge fan of baby legs. They keep legs warm and feet free for new walkers. They also make it soooo much easier for changing diapers, one less article of clothing to take off and put back on a squirmy baby. Did I mention they're cute and your husband will take them off as soon as you aren't looking because his son is wearing "tights"? Lol it will be a constant battle until I'm ready to give them up...he'll be five(not really).
Anyhow here's how to make them for $2.50(less if you find socks on super sale).

You need:
Knee high socks(shorter if making for an itty bitty baby)
A sewing machine with an overlock stitch or a serger(you can use a zigzag but it doesn't come out as nice if you ask me)
And a pair of scissors

Cut bottom of sock off right above the heel. Then cut the middle of the foot off. *2

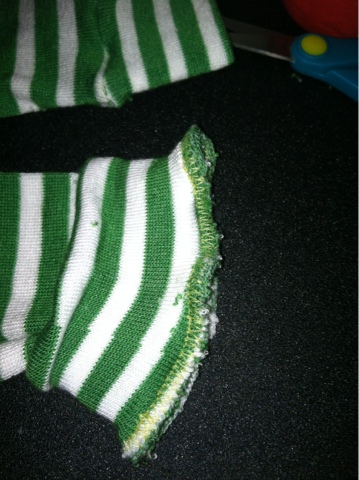
Take middle of foot and fold one side into the other so you have the makings of a cuff (I sewed before taking picture).

Take cuff and slide over the bottom of the long part of your sock. And pin well to avoid slipping. Then serge/sew edges together. *4 and 1

You'll then flip the cuff over and VOILA. It took me a few tries to figure out how to make a good cuff and someone told me to do it this way which looks the best and is easy. Takes 10minutes max! Have fun!*3


*My pictures are in the completely wrong order thanks to doing this from my phone soooo it should go in this order 2,4,1,3.

Tuesday, March 13, 2012

Cheesesteaks anyone?

Josh's favorite meal I make is cheesesteaks and let me tell you, I make waaaaayyyy better food. Like way better, but when you have a picky husband simple is the only way you get praise for your hard work. So here's the most simple cheesesteaks in the history of cheesesteak....

You need:
Package of hoagie buns
2 packages of Tyson precooked steak pieces (found either in the deli or near the meats)
Package of provolone cheese
Butter

Preheat oven to 375
Split hoagies and butter both sides and set on a baking sheet. Once oven is heated toast buns until butter is melted and edges are crisp.
Add steak (use 4 hoagies for thicker sandwiches, more for thinner) and two slices of cheese per hoagie. Return to oven intolerance cheese is melted and steak is warm. Enjoy!


See, easy, really easy! If we liked veggies more I'd add some caramelized onions and peppers. Also experiment with pre cooked steaks, some taste better than others but we usually stick with Tyson since its easiest to find. Happy eating :)

Sunday, March 11, 2012

New store opening!!

Well after months of attempting to sell on Etsy, nothing seems to move. The market is almost too large and there are too many similar items from people who have been selling on there for a long time. So I went to Storenvy, where a) the market is small, b)I don't have to pay them to sell my things, and c) I get an actual store front. There's other markets out there, ie. HyenaCart, but still I need to spend money to sell anything which is ridiculous if you ask me. Storenvy is easy to navigate and easy to use. I list, I sell (hopefully). I can't wait to get a few photos from the props I've sent out to local photographers to make my products a little more well known and to just get some good photos, seeing as I no longer have a newborn in the house, I needed to extend myself to people who frequently have newborns.

Anyhow, here's my store : http://navillus.storenvy.com/ Check it out, share it with your friends :)

Saturday, March 10, 2012

iPhone blogging! Woot!

Ha, really this post is going to be short and sweet. It's exactly 3am and I decided it'd be awesome if I didn't need to blog from my computer so I downloaded the FREE app and voila, here I be!

But to make it more interesting, I finally got a super tight French braid in my 6 year olds hair tonight. I think her hair is finally loosing the baby fine-ness and thickening up like her momma's.

It took a few YouTube videos and some help from hairdressing friends to get this perfect. Best tips: take the three sections (smaller the better)and cross them over a full braid "round". Then take the one strand and cross, after you cross, take another bit of hair from the same side and cross it as well. Always add to the outside pieces, I used to add to all three then braid another "round" which made it look really messy. Also make sure you are holding the hair close to the scalp, holding too far away yields a lose braid. And of course pull tight, even of little girls don't like it they quickly get over the pain when they see how cute they look :) so yea, there's my French braid. I used my daughters natural part since her hair was dry and she was going to bed anyhow, but obviously most people want a straight part.

Ok to bed I go...3:10! Good thing mr. Mom let's me sleep in on the weekends, such a good guy :)

Wednesday, March 7, 2012

I should blog I guess...

Because I have so much time in my life to do so...But really, I should find something else to monopolize my time besides certain social networks. I mean after my kids are in bed or engrossed in other activities because I would NNEEEVVVVERRR post a status update during mommy times...sigh, I'm a horrible mom sometimes.
Anyhow I suppose your first post on a blog should be something witty and cool, something everyone will be linked to in their favorite search engines upon typing the correct set of words...but I have nothing witty to say. Normally I am quite witty, or think so anyhow. Others probably see me as snobbish or something less appealing.  I'm sure I'm the one at the get together's everyone is talking about because I'm not as intelligent or as quick with the come backs as I thought and really come off as a weirdo huh?


ANYWHO. So the title of my blog is Recipes of a Homemaker, why? because everything I do has a method, a sequence of events, a pattern, or quite simply...a recipe. Today's recipe is a FAILED attempt at a healthy Red Velvet cake that I got from Pinterest...link http://www.laaloosh.com/2009/03/03/weight-watchers-red-velvet-cake-recipe/
Gathered materials
I hate my hand mixer and didn't want to get out my Kitchenaide, so I used a whisk...don't do this, it's time consuming and a pain in the butt, mine ended up not completely mixed obviously.

I believe the recipe says to just spray with Pam but I never have luck with that so I sprayed and floured.

I don't know, maybe I was super impatient and removed the cakes to early from the pans (I totally did), however when I tried to layer the cakes after a few hours of cooling they literally fell apart in my hands. There's a reason we use eggs in baking. They HOLD STUFF TOGETHER!!! Diet Dr. Pepper is not a good coagulant. On a good note, it tasted fantastic.  Also, the frosting so did not do what it was supposed to. The recipe calls for 2 cups of milk, one cup was probably enough, I did like 1 1/3 cups and it was to watery. I put it in the fridge during dinner (another Pinterest inspiration) and it still didn't thicken up like I wanted it too. Oh well. I also didn't use the sugar-free or low fat pudding it called for because the local super grocery chain  that everyone goes to because it has "everything", you know the one that rhymes with Callfart, yeah that one, didn't have it...go figure. Again, at least it tasted good.
DS2 enjoying it. He isn't a big fan of cake but he ate all of this!

I had to stop feeding the baby or he'd eat the whole slice after eating a big dinner the kid was gonna explode.

I should've taken a picture of the falling apart cake that I spooned onto our plates...maybe tomorrow.